Post by Jethro on Aug 24, 2015 22:30:34 GMT 2
This guide is given as is and should not be considered Law. It is developed with the input from the mini community. Always consult your many manuals.
Always remember that you work on your car at your own risk.
[Guide] Adjusting your valve clearance (rockers/tappets)
Symptom: A "tick-tick-tick" sound coming from your engine that increases with engine speed. Most noticeable during idle.
A possible cause could be your valve clearance being out, causing excessive noise. It is an inexpensive and quick check/fix that can be done on your own without special tools in an afternoon.
Difficulty: Easy - no experience required
Time: - Less than 1 hour
Tools: - feeler-gauge (particularly the 0.3mm)
- large flat screwdriver
- 16mm socket (a spanner can be used but will take a bit longer)
- 11mm spanner
- scraper or razor blade
- liquid gasket/sealant (I got REINZOSIL Universal sealing compound from Midas for R70) - Optional
- cork rocker cover gasket (can be easily cut from a generic) Optional if your current one is damaged
- wheel jack (optional)
- axle stands (optional)
Method:
Step 1:
Open your bonnet *duh!*. Try and get it secure as high as possible
Step 2: - Removing the rocker-cover
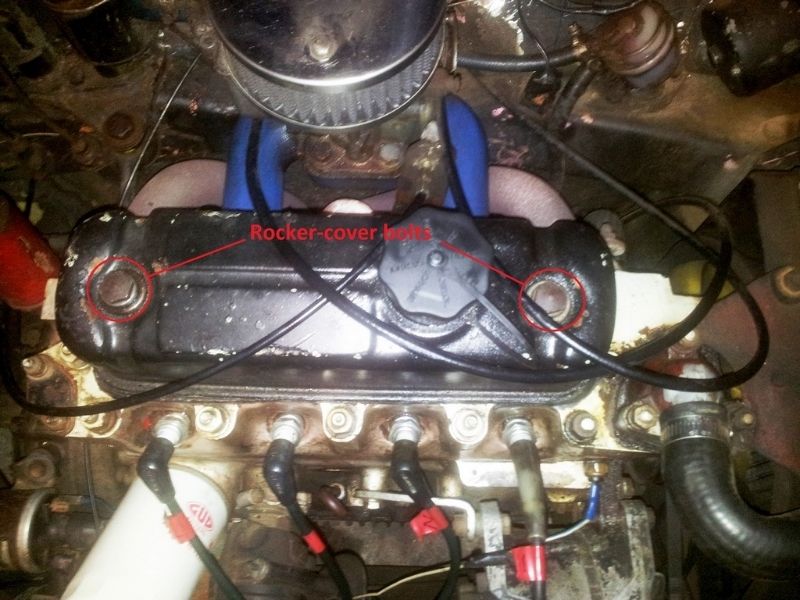
You need to remove your rocker-cover. This can be done easily using a socket wrench or spanner to undo the two rocker-cover bolts. You may need to disconnect any cables that prevent you from lifting the rocker-cover such as the vacuum advance pipe to the carburetor. Make sure to label what you disconnect. In my case; I didn't need to remove any cables. Be careful when lifting the rocker-cover and try not to damage the current cork or fibre gasket. The gasket will often stay behind when you lift the rocker-cover. Either way ignore it for now.
Step 3: - Rotating the engine
You will need a way to rotate your engine. There are two easy ways to do this without running yourself over. In both cases you will need to first remove your spark-plugs, then:
- You can either turn the big nut on the right hand side of your alternator with a large spanner with the car in neutral. Do this while applying pressure onto the fan belt to stop it slipping.
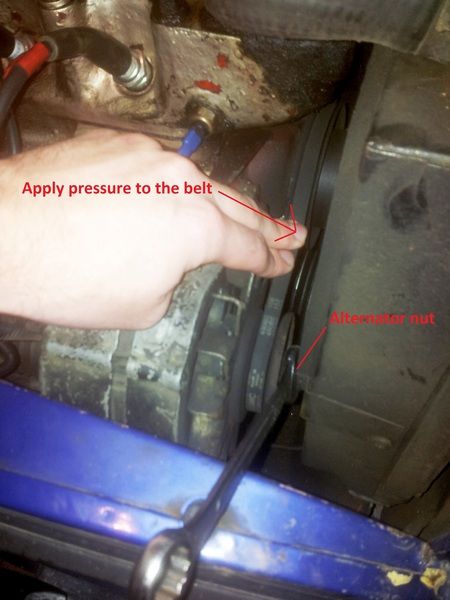
- Or you can put the car in 4th gear (hand-brake up) then jack up one of the front wheels (using the jacking mount or sub-frame, not the floor!). The wheel needs to only juuust be off the floor. You can then rotate the engine by turning the tyre by hand. If you have axle stands you can use those to support both wheels if you want, but only one is necessary.
I used the jack method as I didn't have the right sized spanner for the alternator nut and turning the wheel was super easy.
Step 4:
With the rocker cover off and the wheel in the air/spanner on the nut you should take a moment to familiarize yourself with your rockers.
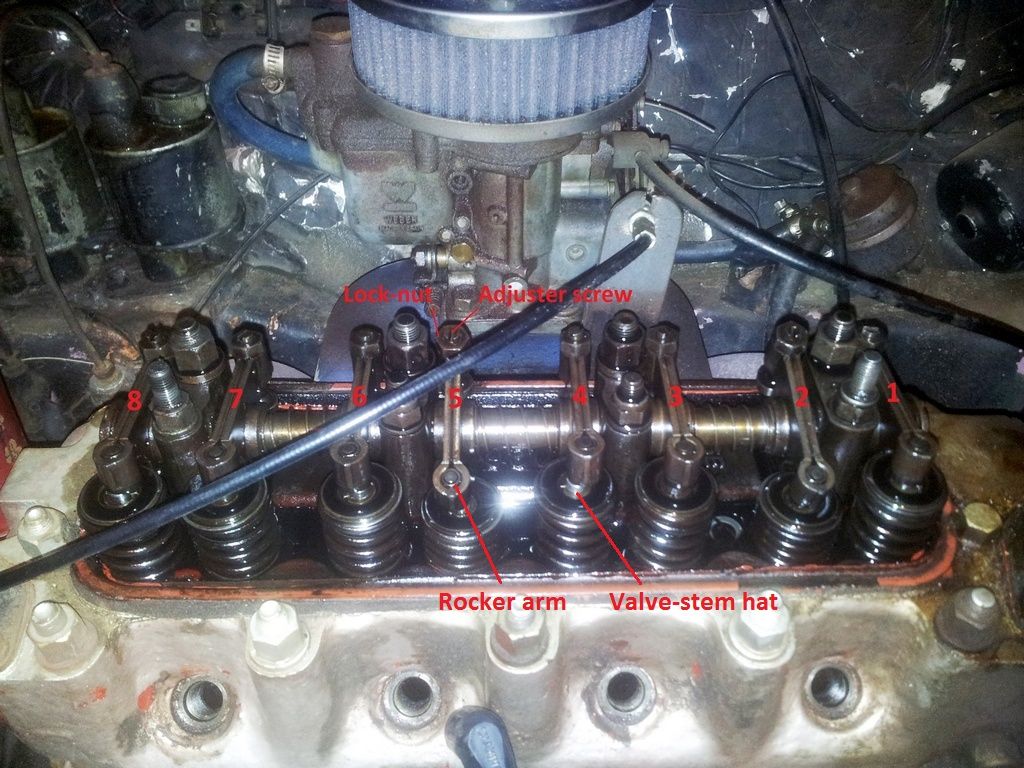
There are 8 rockers (for your 8 valves) numbered from 1 - 8 from the radiator side. Turn the engine using your chosen method for a bit and see how they move - it's pretty cool!
The nuts with a screw in them on the firewall/carb/windshield/back side are where you will be doing the adjusting.
The rocker arm and the valve stem-hat are where you will be checking the clearance.
Step 5: - Checking the gap
The rule of 9 is an easy one to remember: When you want to check the gap of valve no.1 you need no.8 to be fully open. If you want to check no. 2 then no.7 needs to be fully open, etc. The valve numbers should always add up to 9.
Follow this sequence to minimize the amount of engine turning you need to do.
Check valve: 1 with 8 fully open
then: 3 with 6 fully open
5 with 4 fully open
2 with 7 fully open
8 with 1 fully open
6 with 3 fully open
4 with 5 fully open
7 with 2 fully open
To check the clearance on the desired valve, you make sure the corresponding valve is in the fully open position. You do this by rotating the engine until the corresponding rocker in the right hand column above is at the lowest/bottom point of it's travel. In other words: rotate the engine until the rocker arm stops moving down (just before it starts to move up again). That is the valve fully open.
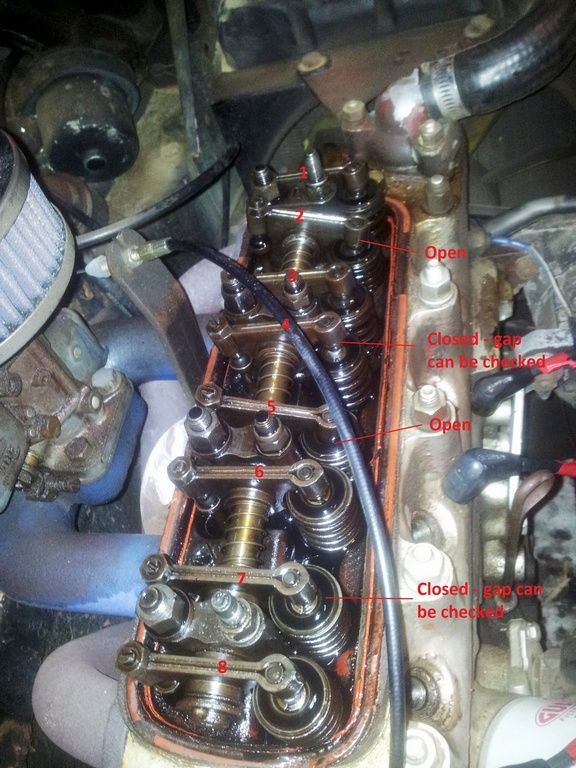
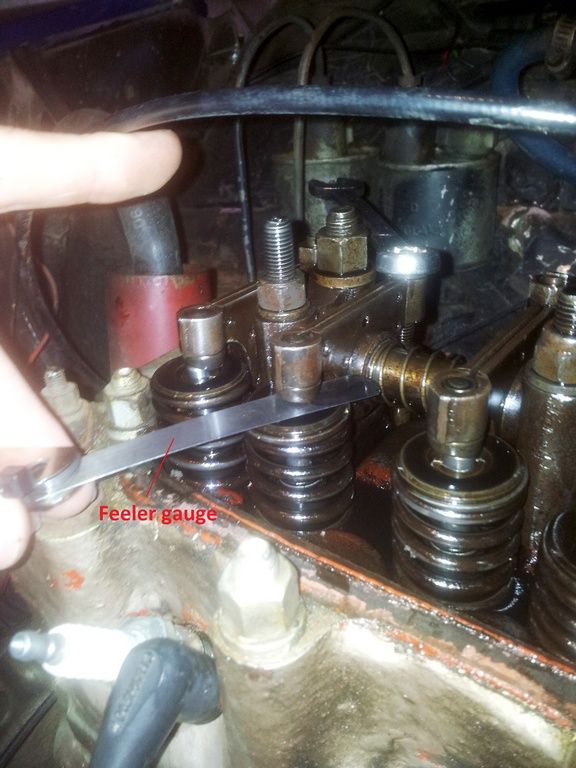
You then insert the 0.2mm feeler gauge in the gap between the rocker and the valve-hat.
If you cannot get the gauge in then the gap is too small. If it is a loose fit then the gap is too big. The feeler gauge needs to be a tight fit where it requires some effort to insert and remove it. Like putting your foot into a tight shoe.
Step 6: - Adjusting the gap
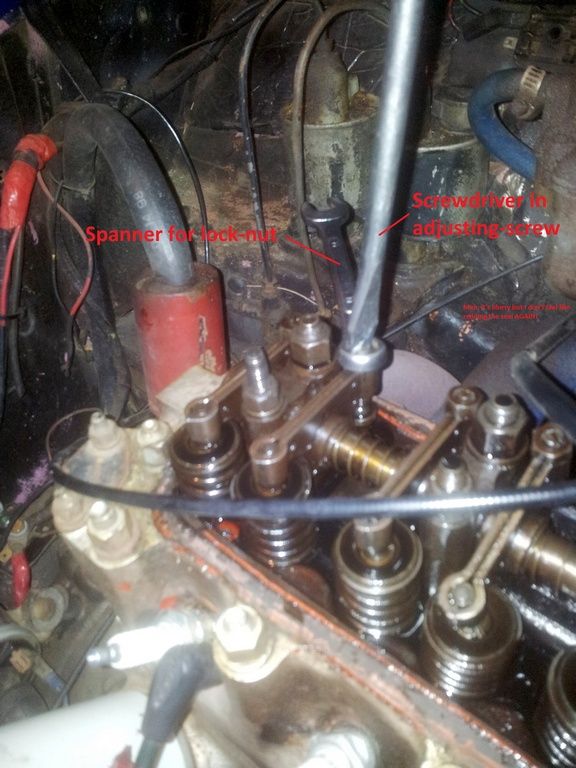
To adjust the gap you first loosen the lock-nut with the ring side of the 11mm spanner in an anti-clockwise direction. You only need to loosen it about half a turn.
You then turn the adjuster-screw to decrease (anti-clockwise) or increase (clockwise) the gap. Use the biggest screwdriver that fits to reduce damaging the adjuster-screw head
Once you are happy with the gap, you then need to hold the adjuster-screw in position while you tighten the lock-nut (clockwise). The lock-nut needs to be tightened firm so that it doesn't rattle off but not over kill! Don't force it!
Check the gap one last time to make sure the adjuster-screw didn't move then move onto the next one by again rotating the engine until the corresponding valve is in the fully open position.
Step 7: - Replacing the gasket and cleaning
Once you are happy with the gaps, there are a few things to do before you put the rocker cover back on. You will first need to clean the old sealant off and also inspect your cork gasket.
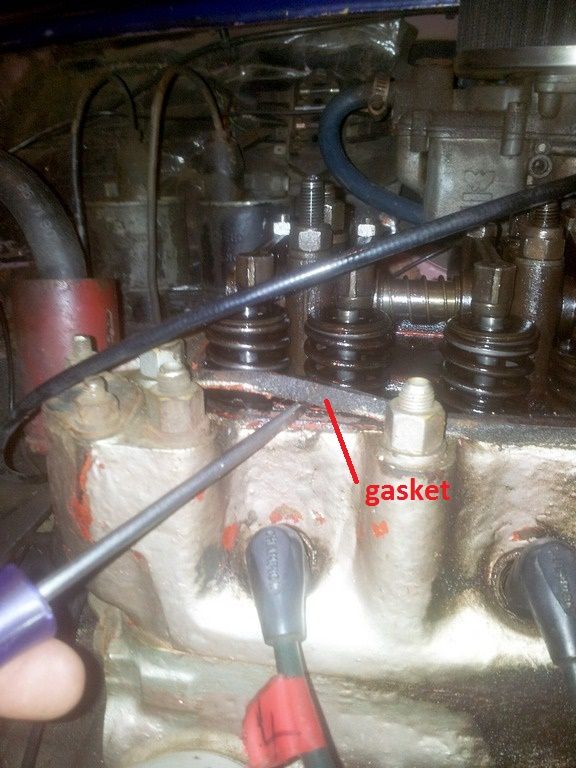
The cork gasket can be removed with a blunt screw driver. Be careful with it if you plan to re-use it. If you have a new one then you don't need to worry, just be careful not to damage the surface of the head.
Skip the next step if you have a new gasket.
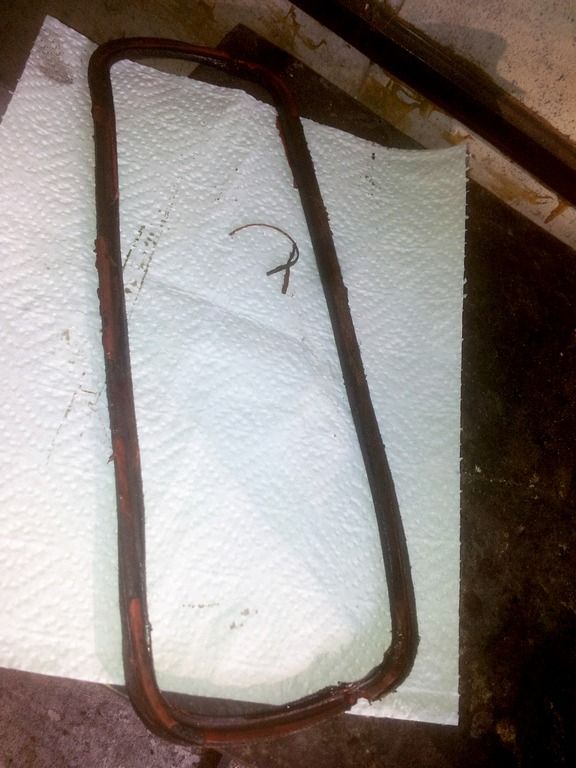
To clean the gasket, you simply need to scrape the old sealant off. I used a screwdriver again and gently scraped the old sealant off. It came off quite easily. Again, be careful if you plan to re-use the gasket. I re-used mine as I thought it would be OK, although next time I'll use a new one as the old one is shaped/grooved with how it was originally fitted which can be a bit difficult to line up again.
Before:
After:
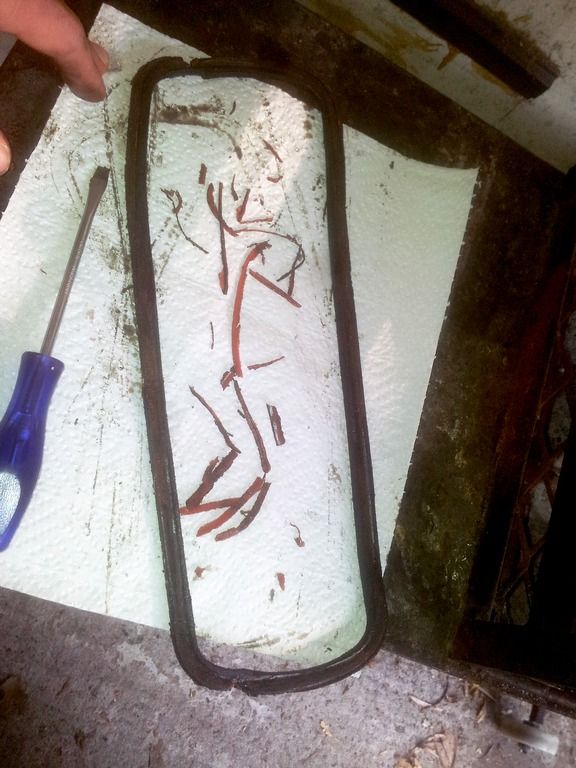
Next, it is a good idea to clean the old sealant off of the head. You should also clean off any grease, oil and dirt from the surface being careful not to push any grime into your rockers.
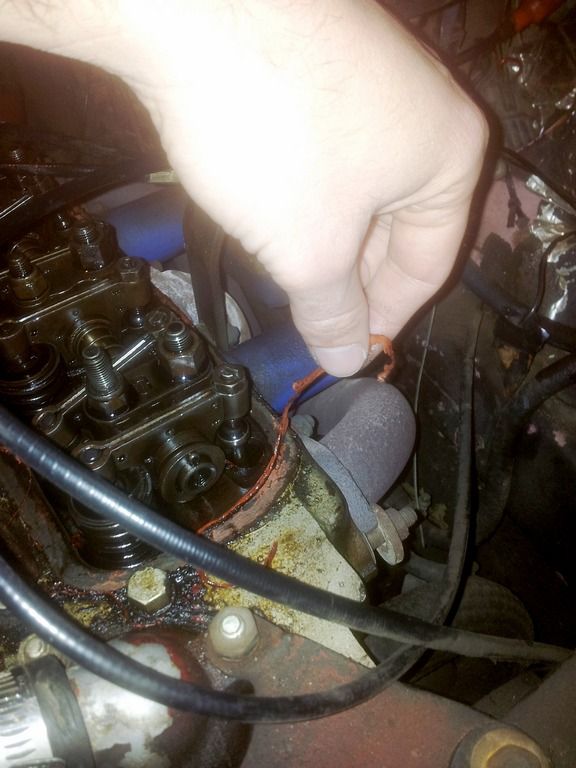
Step 8: - Resealing
The use of sealant is considered unnecessary when using a new gasket, although it will do no harm other than make for some extra cleaning next time. I used sealant as my gasket was very old and I wanted to reuse it. It's up to you.
Now comes the fun(messy) part. Place your rocker-cover upside down and squeeze a small pea sized bead of sealant along the groove/sealing edge. Once you are happy, fit your gasket on the upside down rocker-cover making sure that it makes a good seal with no gaps. Next smear a thin amount of sealant on the gasket face that will be in contact with the engine head (I used my finger so my hands were very dirty at this point so no pictures).
Once done you then carefully replace the rocker-cover (with the gasket stuck to it) back onto the head, with the oil filler neck on the radiator side.
Step 9:
Now all that is left is to tighten the rocker-cover bolts and replace your spark plugs and leads and any cables you disconnected. You can also run your finger around the bottom edge of the rocker-cover to smooth out any excess sealant that may have been forced out as you tighten the bolts. Again, the bolts must be tightened firm but not excessively - there is no pressure or force acting on them so do not over-tighten. Check the instructions on your sealant for how long you should leave it to cure before driving.
Step 10:
I did this job in the afternoon/evening so I left it until the next morning then took it for a drive until the engine reached normal temperature. When I got home I checked around the rocker-cover for any oil that may have leaked onto the head (another reason to clean the old oil/dirt off before you replace the gasket). With no leaks, I called it a success! With the gaps correctly adjusted, I even enjoyed a little more braap!
- As a side note, while doing research, I came across this post on the uk mini forum which suggested that there are two different clearances depending on the cam:
With high lift cams (ie 268 duration up) you clearance needs to be 15 thousandths of an inch / 0.38mm
With a standard cam it will be 12 thousandths of an inch / 0.30mm
Click here for the link
- It has also been suggested that if you still notice an excessive ticking noise that the tappet hats may be worn. The little bump may be indented from the rocker-arm so when you insert your feeler-gauge you are getting an incorrect reading.
Please feel free to comment with any suggestions or tips you have and how useful you found the guide.
Always remember that you work on your car at your own risk.
[Guide] Adjusting your valve clearance (rockers/tappets)
Symptom: A "tick-tick-tick" sound coming from your engine that increases with engine speed. Most noticeable during idle.
A possible cause could be your valve clearance being out, causing excessive noise. It is an inexpensive and quick check/fix that can be done on your own without special tools in an afternoon.
Difficulty: Easy - no experience required
Time: - Less than 1 hour
Tools: - feeler-gauge (particularly the 0.3mm)
- large flat screwdriver
- 16mm socket (a spanner can be used but will take a bit longer)
- 11mm spanner
- scraper or razor blade
- liquid gasket/sealant (I got REINZOSIL Universal sealing compound from Midas for R70) - Optional
- cork rocker cover gasket (can be easily cut from a generic) Optional if your current one is damaged
- wheel jack (optional)
- axle stands (optional)
Method:
Step 1:
Open your bonnet *duh!*. Try and get it secure as high as possible
Step 2: - Removing the rocker-cover
You need to remove your rocker-cover. This can be done easily using a socket wrench or spanner to undo the two rocker-cover bolts. You may need to disconnect any cables that prevent you from lifting the rocker-cover such as the vacuum advance pipe to the carburetor. Make sure to label what you disconnect. In my case; I didn't need to remove any cables. Be careful when lifting the rocker-cover and try not to damage the current cork or fibre gasket. The gasket will often stay behind when you lift the rocker-cover. Either way ignore it for now.

Step 3: - Rotating the engine
You will need a way to rotate your engine. There are two easy ways to do this without running yourself over. In both cases you will need to first remove your spark-plugs, then:
- You can either turn the big nut on the right hand side of your alternator with a large spanner with the car in neutral. Do this while applying pressure onto the fan belt to stop it slipping.

- Or you can put the car in 4th gear (hand-brake up) then jack up one of the front wheels (using the jacking mount or sub-frame, not the floor!). The wheel needs to only juuust be off the floor. You can then rotate the engine by turning the tyre by hand. If you have axle stands you can use those to support both wheels if you want, but only one is necessary.
I used the jack method as I didn't have the right sized spanner for the alternator nut and turning the wheel was super easy.
Step 4:
With the rocker cover off and the wheel in the air/spanner on the nut you should take a moment to familiarize yourself with your rockers.
There are 8 rockers (for your 8 valves) numbered from 1 - 8 from the radiator side. Turn the engine using your chosen method for a bit and see how they move - it's pretty cool!
The nuts with a screw in them on the firewall/carb/windshield/back side are where you will be doing the adjusting.
The rocker arm and the valve stem-hat are where you will be checking the clearance.

Step 5: - Checking the gap
The rule of 9 is an easy one to remember: When you want to check the gap of valve no.1 you need no.8 to be fully open. If you want to check no. 2 then no.7 needs to be fully open, etc. The valve numbers should always add up to 9.
Follow this sequence to minimize the amount of engine turning you need to do.
Check valve: 1 with 8 fully open
then: 3 with 6 fully open
5 with 4 fully open
2 with 7 fully open
8 with 1 fully open
6 with 3 fully open
4 with 5 fully open
7 with 2 fully open
To check the clearance on the desired valve, you make sure the corresponding valve is in the fully open position. You do this by rotating the engine until the corresponding rocker in the right hand column above is at the lowest/bottom point of it's travel. In other words: rotate the engine until the rocker arm stops moving down (just before it starts to move up again). That is the valve fully open.

You then insert the 0.2mm feeler gauge in the gap between the rocker and the valve-hat.
If you cannot get the gauge in then the gap is too small. If it is a loose fit then the gap is too big. The feeler gauge needs to be a tight fit where it requires some effort to insert and remove it. Like putting your foot into a tight shoe.

Step 6: - Adjusting the gap
To adjust the gap you first loosen the lock-nut with the ring side of the 11mm spanner in an anti-clockwise direction. You only need to loosen it about half a turn.
You then turn the adjuster-screw to decrease (anti-clockwise) or increase (clockwise) the gap. Use the biggest screwdriver that fits to reduce damaging the adjuster-screw head
Once you are happy with the gap, you then need to hold the adjuster-screw in position while you tighten the lock-nut (clockwise). The lock-nut needs to be tightened firm so that it doesn't rattle off but not over kill! Don't force it!
Check the gap one last time to make sure the adjuster-screw didn't move then move onto the next one by again rotating the engine until the corresponding valve is in the fully open position.

Step 7: - Replacing the gasket and cleaning
Once you are happy with the gaps, there are a few things to do before you put the rocker cover back on. You will first need to clean the old sealant off and also inspect your cork gasket.
The cork gasket can be removed with a blunt screw driver. Be careful with it if you plan to re-use it. If you have a new one then you don't need to worry, just be careful not to damage the surface of the head.

Skip the next step if you have a new gasket.
To clean the gasket, you simply need to scrape the old sealant off. I used a screwdriver again and gently scraped the old sealant off. It came off quite easily. Again, be careful if you plan to re-use the gasket. I re-used mine as I thought it would be OK, although next time I'll use a new one as the old one is shaped/grooved with how it was originally fitted which can be a bit difficult to line up again.
Before:

After:

Next, it is a good idea to clean the old sealant off of the head. You should also clean off any grease, oil and dirt from the surface being careful not to push any grime into your rockers.

Step 8: - Resealing
The use of sealant is considered unnecessary when using a new gasket, although it will do no harm other than make for some extra cleaning next time. I used sealant as my gasket was very old and I wanted to reuse it. It's up to you.
Now comes the fun(messy) part. Place your rocker-cover upside down and squeeze a small pea sized bead of sealant along the groove/sealing edge. Once you are happy, fit your gasket on the upside down rocker-cover making sure that it makes a good seal with no gaps. Next smear a thin amount of sealant on the gasket face that will be in contact with the engine head (I used my finger so my hands were very dirty at this point so no pictures).
Once done you then carefully replace the rocker-cover (with the gasket stuck to it) back onto the head, with the oil filler neck on the radiator side.
Step 9:
Now all that is left is to tighten the rocker-cover bolts and replace your spark plugs and leads and any cables you disconnected. You can also run your finger around the bottom edge of the rocker-cover to smooth out any excess sealant that may have been forced out as you tighten the bolts. Again, the bolts must be tightened firm but not excessively - there is no pressure or force acting on them so do not over-tighten. Check the instructions on your sealant for how long you should leave it to cure before driving.
Step 10:
I did this job in the afternoon/evening so I left it until the next morning then took it for a drive until the engine reached normal temperature. When I got home I checked around the rocker-cover for any oil that may have leaked onto the head (another reason to clean the old oil/dirt off before you replace the gasket). With no leaks, I called it a success! With the gaps correctly adjusted, I even enjoyed a little more braap!
- As a side note, while doing research, I came across this post on the uk mini forum which suggested that there are two different clearances depending on the cam:
With high lift cams (ie 268 duration up) you clearance needs to be 15 thousandths of an inch / 0.38mm
With a standard cam it will be 12 thousandths of an inch / 0.30mm
Click here for the link
- It has also been suggested that if you still notice an excessive ticking noise that the tappet hats may be worn. The little bump may be indented from the rocker-arm so when you insert your feeler-gauge you are getting an incorrect reading.
Please feel free to comment with any suggestions or tips you have and how useful you found the guide.
